
11 October, 2023
Breathing New Life into Old Bottles: The Art of Repurposing Plastic
In an age where the narrative on sustainability is at the forefront of global discussions, the looming shadow of plastic waste stands tall. Each year, billions of plastic drink bottles are consumed worldwide, with a significant portion ending up in landfills or polluting our oceans. While the mantra "reduce, reuse, recycle" has echoed through the decades, the emphasis often leans heavily towards the latter. However, the concept of reuse—specifically, the ingenious art of repurposing—presents a unique and creative solution to this mounting issue. Repurposing plastic drink bottles not only reduces the environmental burden but also uncovers a world of functional and aesthetic possibilities. From practical household tools to artsy crafts and DIY projects, dive into the transformative world of giving plastic bottles a second, purposeful life.
Below are just a few ways you could repurpose your old plastic drink bottles
1) Mini Garden Planter
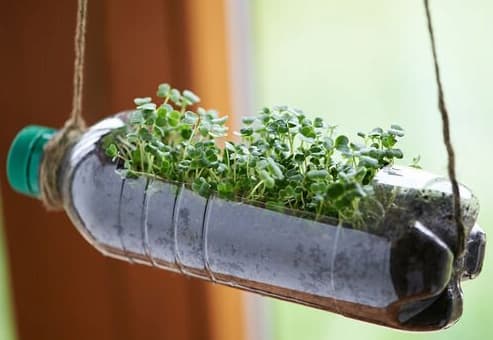
In today's urbanised spaces where every inch counts, mini garden planters made from repurposed drink bottles present a unique and sustainable solution for plant lovers. Not only do they add a touch of green to compact living spaces, but they also promote recycling and creative reuse. Here's a deeper dive into this green innovation:
Begin by selecting a drink bottle of your choice. While any size will do, larger bottles offer more room for the plant roots to grow. The next step involves cutting off the top portion, ensuring that the remaining base is deep enough to accommodate the soil and roots. Once done, make sure to puncture a few small holes at the bottom for drainage to prevent waterlogging.
Given the limited space in a bottle planter, choosing plants that thrive in such conditions is essential. Herbs like basil, mint, or cilantro are great choices as they require a modest amount of soil. Succulents, renowned for their adaptability, can also flourish in these mini planters. Alternatively, flowering plants like pansies or marigolds can add a burst of colour to your mini garden.
One of the standout features of these bottle planters is their potential for vertical gardening. You can hang these bottle planters in series using ropes or strings, creating a cascading green curtain. This setup is particularly attractive for balconies or windowsills, maximising your green space without taking up floor area.
By turning drink bottles into mini garden planters, you are giving them a new lease on life. This prevents plastic waste from ending up in landfills and reduces the demand for new plastic production. Plus, plants are natural air purifiers, so while you're reducing waste, you're also enhancing the air quality in your living space.
2) Bird Feeders

Birds chirping and fluttering in our backyards often bring a sense of serenity and connection to nature. Creating DIY bird feeders from drink bottles can be an enchanting experience for those inclined towards nature and sustainable living. These feeders not only attract a variety of birds but also promote recycling and eco-friendliness.
Selecting a sturdy drink bottle is the first step. This ensures that the feeder will hold up in various weather conditions. Make a couple of small holes near the bottom to craft the feeder. These holes should be large enough for birdseed to trickle out but small enough to control the flow. Insert short lengths of wooden sticks or dowels beneath these holes to act as perches for the birds. The perches provide birds with a spot to rest and feast.
Once your drink bottle bird feeder is ready, the next step is to fill it with birdseed. Depending on your regional bird population, you can opt for a mix of seeds to attract various species. Sunflower seeds, millets, and cracked corn are general favourites. When hanging your bird feeder, choose a location that is easily visible from your window or patio yet safe from common bird predators. Ideally, it should be hung at a height where cats and other predators can't easily reach, and preferably near trees or shrubs where birds can quickly take cover.
In urban areas where natural food sources might be sparse, these feeders can be a haven for local birds. Additionally, as seasons change, and during winters especially, bird feeders can supplement the natural diet of these feathered creatures, ensuring they have a constant food supply.
3) DIY Lava Lamp
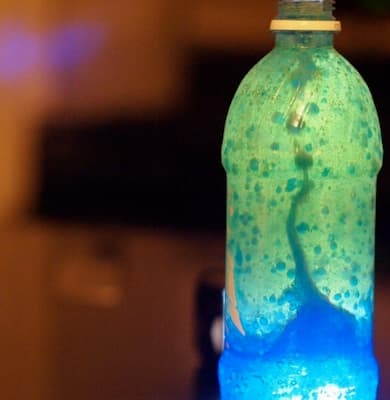
The allure of the lava lamp, with its hypnotic dance of floating blobs, has remained timeless since its inception in the 1960s. Today, with a touch of DIY creativity, you can recreate this iconic piece of decor using a simple drink bottle, captivating audiences of all ages.
Start with a clean, transparent drink bottle, ensuring it's free from labels or residue. The clearer the bottle, the better your results will be. The main ingredients for this project include water, vegetable oil, food colouring, and effervescent tablets, which can be easily sourced from your kitchen or local store.
Begin by filling about one-third of the drink bottle with water. Add a few drops of your preferred food colouring to the water. This is the time to get creative - mix and match to get your desired hue. Gently pour vegetable oil into the bottle until it's almost full. You'll notice the oil floats on top due to its lower density.
Now for the show-stopping step! Drop an effervescent tablet into the bottle. As it dissolves, it releases carbon dioxide bubbles. These bubbles travel through the oil layer, picking up the coloured water and creating the mesmerising 'lava' effect as they rise and fall.
Besides being a captivating visual treat, the DIY lava lamp serves as an excellent hands-on learning experiment, especially for kids. It introduces fundamental scientific concepts such as density (oil vs. water), immiscibility (oil and water don't mix), and gas formation (from the effervescent tablet).
It's important to note that while this DIY lava lamp is safe for observation, its contents are not meant for consumption. Ensure that the bottle cap remains tightly closed, and always supervise children during the creation process. Over time, if the effervescence diminishes, you can simply add another tablet to rejuvenate the dance of bubbles.
4) Homemade Dumbbell
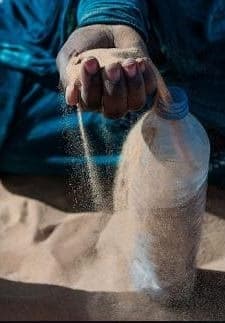
In today's world of high-tech gyms and advanced exercise equipment, it's easy to forget that sometimes, the simplest solutions can be the most effective. This principle is perfectly embodied by the homemade dumbbell made from everyday drink bottles. Whether travelling, on a budget, or just getting started with strength training, these DIY weights can be a game-changer.
To start your DIY dumbbell project, you'll need two empty drink bottles of the same size and shape. This ensures uniform weight distribution and balance during your workouts. Depending on your desired weight and availability, your filling material options include sand, water, pebbles, or even rice.
Ensure the bottles are thoroughly cleaned and dried to avoid mould or odour issues. Fill the bottles with your chosen material using a funnel. Remember, the denser the material, the heavier your dumbbell will be. Sand and pebbles will generally make for heavier weights than water. Ensure the bottle caps are screwed on securely to prevent leaks or spillage during your workouts. Before starting your exercises, test the weight of each bottle to ensure they're suitable for your fitness level.
By repurposing drink bottles, you're giving new life to an item that might otherwise end up in a landfill. It's a sustainable choice that benefits both your body and the planet.
5) DIY Drip Irrigation

The global push towards sustainability and the need for water conservation has made us more innovative and resourceful. One simple yet effective method of reusing plastic drink bottles is by turning them into a drip irrigation system. This DIY approach not only upcycles waste but also ensures your plants remain hydrated, especially during those sweltering summer days or while you're away on vacation.
Begin by thoroughly cleaning and drying the plastic bottle. This ensures no unwanted residues mix with the water. Carefully make a tiny hole in the bottle cap using a pin or small needle. The size of the hole will determine the rate of water flow. A smaller hole will provide a slower drip, lasting longer. Fill the bottle with water and screw the cap back on securely. Turn the bottle upside-down and nestle it into the soil near the base of your plant. Ensure it's stable and won't topple over.
By controlling the water flow, this system ensures minimal wastage, making it an eco-friendly irrigation method. Plants benefit from a consistent moisture level. A steady, slow drip means they won't dry out between your regular watering days. This method is particularly useful if you have a varied schedule or are planning to be away. The bottle drip system will look after your plants in your absence.
While a single bottle works well for individual plants or pots, you can set up multiple bottles for larger garden beds. For plants with greater water needs, using bigger bottles or multiple bottles clustered together can be more effective.
6) Toy Rocket for Kids

In the eyes of a child, the world is filled with wonder and imagination, and with a little creativity, mundane items can be transformed into toys and playthings. A simple drink bottle, for instance, can metamorphose into an exciting toy rocket. Not only does this crafty endeavour entertain, but it also offers a glimpse into basic scientific principles, making learning fun and interactive.
Start by allowing your child to decorate the bottle. They can paint it with acrylics, add glitter, or glue on coloured paper cut-outs to make it resemble a rocket. Stickers with stars, planets, and astronauts can add a fun touch. Don’t forget to draw or stick on a door or window!
Here's where the magic happens. Combining baking soda and vinegar creates a chemical reaction that produces carbon dioxide gas. This gas builds pressure inside the bottle until it forces the liquid out, propelling the bottle upwards. Remember, this should always be done outdoors in an open area and under adult supervision.
Fill the bottle about one-third with vinegar.
Using a funnel, add a couple of spoons of baking soda into a rolled paper. This will allow you to quickly dump the baking soda into the vinegar without it reacting immediately. After adding the baking soda, quickly screw on the bottle cap. Place the bottle on the ground, cap side down, and stand back. Watch the rocket take off!
This activity offers a practical demonstration of an acid-base reaction. The fizz and bubbling can be a great conversation starter about chemical reactions and the production of gas. The propulsion of the bottle rocket touches on principles of physics, particularly Newton’s Third Law: for every action, there's an equal and opposite reaction.
Using an old drink bottle emphasises the concept of recycling and repurposing, planting seeds of environmental awareness in young minds.
Ensure that kids wear safety goggles to protect their eyes. While the reaction isn't particularly dangerous, it's always best to be cautious, especially when working with younger children.
Conclusion
There are many ways we can repurpose our old plastic drink bottles. Don't just throw them into waste and have them clog up our earth. Repurpose and reuse, and everyone benefits.
The Drink Bottles Team